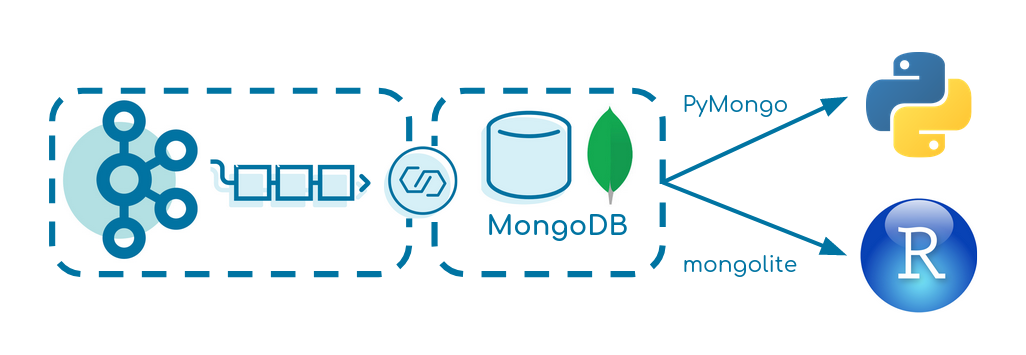
This small tutorial creates a data pipeline from Apache Kafka over MongoDB into R or Python.
It focuses on simplicity and can be seen as a baseline for similar projects.
The Kafka Producer produces fake events of a driving truck into the topic truck-topic in JSON format every two seconds.
Verify that data is produced correctly:
We use Kafka Connect to transfer the data from Kafka to MongoDB.
Verify that the MongoDB Source and Sink Connector is added to Kafka Connect correctly:
This extends Angular CLI to improve the i18n extraction and merge workflow.
New/removed translations are added/removed from the target translation files and translation states are managed.
Additionally, translation files are normalized (whitespace, stable sort) so that diffs are easy to read
(and translations in PRs might actually get reviewed 😉 ).
Tip
If you’d like to keep your translation process simple and rather validate translations, then waiting for actual translations, I’d like you to check out doloc.io.
Created by the maintainer of ng-extract-i18n-merge (@daniel-sc),
it integrates seamlessly with this library (see here) and provides instant translations on extraction!
Expect great translations!
Install
Prerequisites: i18n setup with defined target locales in angular.json – as
documented here.
ng add ng-extract-i18n-merge
Upgrade from 1.x.x to 2.0.0
Run ng update ng-extract-i18n-merge@2 to upgrade from v1 to v2. This migration
switches to Angular’s built-in extract-i18n builder and changes some defaults
(see breaking changes below).
If you plan to upgrade from v1 straight to v3 you must first upgrade to v2 using
the command above and then run ng update ng-extract-i18n-merge again for the
v3 update.
Breaking changes:
Now this plugin uses the default Angular extract-i18n target – so you can
simply run ng extract-i18n.
Default sort is now stableAppendNew (was idAsc).
Leading/trailing whitespaces are normalized (collapsed to one space) but not
completely trimmed.
The provided npm run script was removed (you can create your own if needed).
Upgrade from 2.x.x to 3.0.0
Run ng update ng-extract-i18n-merge to update to v3.0.0 using the Angular update mechanism.
This release drops support for Angular 19 and older.
The defaults for prettyNestedTags and sort changed to false and "stableAlphabetNew" respectively.
builderI18n now defaults to @angular/build:extract-i18n instead of @angular-devkit/build-angular:extract-i18n.
During ng update existing builder configurations are updated to keep the previous behaviour (except for builderI18n, where the new default is best for most setups).
Usage
ng extract-i18n # yes, same as before - this replaces the original builder
Configuration
In your angular.json the target extract-i18n that can be configured with the following options:
Path to folder containing all (source and target) translation files.
targetFiles
Inferred from current setup by ng add
Filenames (relative to outputPath of all target translation files (e.g. ["messages.fr.xlf", "messages.de.xlf"]).
sourceLanguageTargetFile
null
If this is set (to one of the targetFiles), new translations in that target file will be set to state="final" (instead of default state="new"). This file can be used to manage changes to the source texts: when a translator updates the target, this tool will hint the developer to update the code occurrences.
sourceFile
messages.xlf. ng add tries to infer non default setups.
Filename (relative to outputPath of source translation file (e.g. "translations-source.xlf").
removeIdsWithPrefix
[]
List of prefix strings. All translation units with matching id attribute are removed. Useful for excluding duplicate library translations. Cannot be used in combination with includeIdsWithPrefix.
includeIdsWithPrefix
[]
List of prefix strings. When non-empty, only translations units with matching id are included. Useful for extracting translations of a single library in a multi-library project. Cannot be used in combination with removeIdsWithPrefix.
fuzzyMatch
true
Whether translation units without matching IDs are fuzzy matched by source text.
resetTranslationState
true
Reset the translation state to new/initial for new/changed units.
prettyNestedTags
false
If source/target only contains xml nodes (interpolations, nested html), true formats these with line breaks and indentation. false keeps the original angular single line format. Note: while true was the historic implementation, it is not recommended, as it adds whitespace between tags that had no whitespace in between and increases bundle sizes.
selfClosingEmptyTargets
true
If false empty target nodes are non self-closing.
sortNestedTagAttributes
false
Attributes of xml nodes (interpolations, nested html) in source/target/meaning/description can be sorted for normalization.
collapseWhitespace
true
Collapsing of multiple whitespaces/line breaks in translation sources and targets. This handles changed leading/trailing whitespaces intelligently – i.e. updates the target accordingly without resetting the translation state when only leading/trailing whitespace was changed.
trim
false
Trim translation sources and targets.
includeContext
false
Whether to include the context information (like notes) in the translation files. This is useful for sending the target translation files to translation agencies/services. When sourceFileOnly, the context is retained only in the sourceFile.
includeContextLineNumber
true
If includeContext has been included allow the inclusion of line number to be optional. This can help reduce noise in the committed xlf files for strings that have not changed but their line number was shifted due to other changes in the file.
includeMeaningAndDescription
true
Whether to include the meaning and description information in the translation files.
newTranslationTargetsBlank
false
When false (default) the “target” of new translation units is set to the “source” value. When true, an empty string is used. When 'omit', no target element is created.
sort
"stableAlphabetNew"
Sorting of all translation units in source and target translation files. Supported: "idAsc" (sort by translation IDs), "stableAppendNew" (keep existing sorting, append new translations at the end), "stableAlphabetNew" (keep existing sorting, sort new translations next to alphabetical close IDs).
builderI18n
"@angular/build:extract-i18n"
The builder to use for i18n extraction. Any custom builder should handle the same options as the default angular builder (buildTarget, outputPath, outFile, format, progress).
verbose
false
Extended/debug output – it is recommended to use this only for manual debugging.
Contribute
Feedback and PRs always welcome 🙂
Before developing complex changes, I’d recommend opening an issue to discuss whether the indented goals match the scope of this package.
VirusTotal public and private APIv2 Full support – VT APIv3
My pypi VT package was transfered to VirusTotal ownership
Before using the tool you must set your api key in one of this file or you can start without creating it and you will be prompted to provide the data:
Home Directory:
~.vtapi, ~vtapi.conf
or current directory where vt script placed
.vtapi, vtapi.conf
~.vtapi file content:
[vt]
apikey=your-apikey-heretype=publicintelligence=False#coma separated engine list, can be emptyengines=timeout=60# as for weblogin, this only required for rule managementusername=password=
your type of api access, if private: type=private, if public, you can leave it empty, it will be automatically recognized as public
if you have access to VT Intelligence, you need set intelligence=True
Dependencies:
requests
texttable
python-dateutil
These can be installed via PIP or a package manager.
Example of installing all dependencies using pip:
pipinstall-rrequirements.txt
Thanks to @kellewic and @urbanski
Special thanks to @Seifreed for testing and reporting bugs
Few public API functions taken from Chris Clark script
And finally has been added full public and private API support by Andriy Brukhovetskyy (doomedraven)
BEAR IN MIND THIS IS AN OLD EXAMPLE, use -h for current help
vt -h
usage: value [-h] [-fi] [-udb USERDB] [-fs] [-f] [-fr] [-u] [-ur] [-d] [-i]
             [-w] [-s] [-si] [-et] [-rai] [-itu] [-cw] [-dep] [-eo] [-snr]
             [-srct] [-tir] [-wir] [-rbgi] [-rbi] [-agi] [-dbc] [-ac] [-gc]
             [--get-comments-before DATE] [-v] [-j] [--csv] [-rr] [-rj] [-V]
             [-r] [--delete] [--date DATE] [--period PERIOD] [--repeat REPEAT]
             [--notify-url NOTIFY_URL] [--notify-changes-only] [-wh] [-wht]
             [-pdns] [--asn] [-aso] [--country] [--subdomains]
             [--domain-siblings] [-cat] [-alc] [-alk] [-opi] [--drweb-cat]
             [-adi] [-wdi] [-tm] [-wt] [-bd] [-wd] [-du] [--pcaps] [--samples]
             [-dds] [-uds] [-dc] [-uc] [-drs] [-urs] [-pe]
             [-esa SAVE_ATTACHMENT] [-peo] [-bh] [-bn] [-bp] [-bs] [-dl]
             [-nm NAME] [-dt DOWNLOAD_THREADS] [--pcap] [--clusters]
             [--distribution-files] [--distribution-urls] [--before BEFORE]
             [--after AFTER] [--reports] [--limit LIMIT] [--allinfo] [--rules]
             [--list] [--create FILE] [--update FILE] [--retro FILE]
             [--delete_rule DELETE_RULE] [--share]
             [--update_ruleset UPDATE_RULESET] [--disable DISABLE]
             [--enable ENABLE]
             [value [value ...]]

Scan/Search/ReScan/JSON parse

positional arguments:
  value                 Enter the Hash, Path to File(s) or Url(s)

optional arguments:
  -h, --help            show this help message and exit
  -fi, --file-info      Get PE file info, all data extracted offline, for work
                        you need have installed PEUTILS library
  -udb USERDB, --userdb USERDB
                        Path to your userdb file, works with --file-info
                        option only
  -fs, --file-search    File(s) search, this option, don't upload file to
                        VirusTotal, just search by hash, support linux name
                        wildcard, example: /home/user/*malware*, if file was
                        scanned, you will see scan info, for full scan report
                        use verbose mode, and dump if you want save already
                        scanned samples
  -f, --file-scan       File(s) scan, support linux name wildcard, example:
                        /home/user/*malware*, if file was scanned, you will
                        see scan info, for full scan report use verbose mode,
                        and dump if you want save already scanned samples
  -fr, --file-scan-recursive
                        Recursive dir walk, use this instead of --file-scan if
                        you want recursive
  -u, --url-scan        Url scan, support space separated list, Max 4 urls (or
                        25 if you have private api), but you can provide more
                        urls, for example with public api, 5 url - this will
                        do 2 requests first with 4 url and other one with only
                        1, or you can specify file filename with one url per
                        line
  -ur, --url-report     Url(s) report, support space separated list, Max 4 (or
                        25 if you have private api) urls, you can use --url-
                        report --url-scan options for analyzing url(s) if they
                        are not in VT data base, read preview description
                        about more then max limits or file with urls
  -d, --domain-info     Retrieves a report on a given domain (PRIVATE API
                        ONLY! including the information recorded by
                        VirusTotal's Passive DNS infrastructure)
  -i, --ip-info         A valid IPv4 address in dotted quad notation, for the
                        time being only IPv4 addresses are supported.
  -w, --walk            Work with domain-info, will walk through all detected
                        ips and get information, can be provided ip parameters
                        to get only specific information
  -s, --search          A md5/sha1/sha256 hash for which you want to retrieve
                        the most recent report. You may also specify a scan_id
                        (sha256-timestamp as returned by the scan API) to
                        access a specific report. You can also specify a space
                        separated list made up of a combination of hashes and
                        scan_ids Public API up to 4 items/Private API up to 25
                        items, this allows you to perform a batch request with
                        one single call.
  -si, --search-intelligence
                        Search query, help can be found here -
                        https://www.virustotal.com/intelligence/help/
  -et, --email-template
                        Table format template for email
  -ac, --add-comment    The actual review, you can tag it using the "#"
                        twitter-like syntax (e.g. #disinfection #zbot) and
                        reference users using the "@" syntax (e.g.
                        @VirusTotalTeam). supported hashes MD5/SHA1/SHA256
  -gc, --get-comments   Either a md5/sha1/sha256 hash of the file or the URL
                        itself you want to retrieve
  --get-comments-before DATE
                        A datetime token that allows you to iterate over all
                        comments on a specific item whenever it has been
                        commented on more than 25 times. Token format
                        20120725170000 or 2012-07-25 17 00 00 or 2012-07-25
                        17:00:00
  -v, --verbose         Turn on verbosity of VT reports
  -j, --dump            Dumps the full VT report to file (VTDL{md5}.json), if
                        you (re)scan many files/urls, their json data will be
                        dumped to separated files
  --csv                 Dumps the AV's detections to file (VTDL{scan_id}.csv)
  -rr, --return-raw     Return raw json, in case if used as library and want
                        parse in other way
  -rj, --return-json    Return json with parts activated, for example -p for
                        passive dns, etc
  -V, --version         Show version and exit

All information related:
  -rai, --report-all-info
                        If specified and set to one, the call will return
                        additional info, other than the antivirus results, on
                        the file being queried. This additional info includes
                        the output of several tools acting on the file (PDFiD,
                        ExifTool, sigcheck, TrID, etc.), metadata regarding
                        VirusTotal submissions (number of unique sources that
                        have sent the file in the past, first seen date, last
                        seen date, etc.), and the output of in-house
                        technologies such as a behavioural sandbox.
  -itu, --ITW-urls      In the wild urls
  -cw, --compressedview
                        Contains information about extensions, file_types,
                        tags, lowest and highest datetime, num children
                        detected, type, uncompressed_size, vhash, children
  -dep, --detailed-email-parents
                        Contains information about emails, as Subject, sender,
                        receiver(s), full email, and email hash to download it
  -eo, --email-original
                        Will retrieve original email and process it
  -snr, --snort         Get Snort results
  -srct, --suricata     Get Suricata results
  -tir, --traffic-inspection
                        Get Traffic inspection info
  -wir, --wireshark-info
                        Get Wireshark info
  -rbgi, --rombios-generator-info
                        Get RomBios generator info
  -rbi, --rombioscheck-info
                        Get RomBiosCheck info
  -agi, --androidguard-info
                        Get AndroidGuard info
  -dbc, --debcheck-info
                        Get DebCheck info, also include ios IPA

Rescan options:
  -r, --rescan          Allows you to rescan files in VirusTotal's file store
                        without having to resubmit them, thus saving
                        bandwidth, support space separated list, MAX 25
                        hashes, can be local files, hashes will be generated
                        on the fly, support linux wildmask
  --delete              A md5/sha1/sha256 hash for which you want to delete
                        the scheduled scan
  --date DATE           A Date in one of this formats (example: 20120725170000
                        or 2012-07-25 17 00 00 or 2012-07-25 17:00:00) in
                        which the rescan should be performed. If not specified
                        the rescan will be performed immediately.
  --period PERIOD       Period in days in which the file should be rescanned.
                        If this argument is provided the file will be
                        rescanned periodically every period days, if not, the
                        rescan is performed once and not repeated again.
  --repeat REPEAT       Used in conjunction with period to specify the number
                        of times the file should be rescanned. If this
                        argument is provided the file will be rescanned the
                        given amount of times, if not, the file will be
                        rescanned indefinitely.

File scan/Rescan shared options:
  --notify-url NOTIFY_URL
                        An URL where a POST notification should be sent when
                        the scan finishes.
  --notify-changes-only
                        Used in conjunction with --notify-url. Indicates if
                        POST notifications should be sent only if the scan
                        results differ from the previous one.

Domain/IP shared verbose mode options, by default just show resolved IPs/Passive DNS:
  -wh, --whois          Whois data
  -wht, --whois-timestamp
                        Whois timestamp
  -pdns, --resolutions  Passive DNS resolves
  --asn                 ASN number
  -aso, --as-owner      AS details
  --country             Country
  --subdomains          Subdomains
  --domain-siblings     Domain siblings
  -cat, --categories    Categories
  -alc, --alexa-cat     Alexa category
  -alk, --alexa-rank    Alexa rank
  -opi, --opera-info    Opera info
  --drweb-cat           Dr.Web Category
  -adi, --alexa-domain-info
                        Just Domain option: Show Alexa domain info
  -wdi, --wot-domain-info
                        Just Domain option: Show WOT domain info
  -tm, --trendmicro     Just Domain option: Show TrendMicro category info
  -wt, --websense-threatseeker
                        Just Domain option: Show Websense ThreatSeeker
                        category
  -bd, --bitdefender    Just Domain option: Show BitDefender category
  -wd, --webutation-domain
                        Just Domain option: Show Webutation domain info
  -du, --detected-urls  Just Domain option: Show latest detected URLs
  --pcaps               Just Domain option: Show all pcaps hashes
  --samples             Will activate -dds -uds -dc -uc -drs -urs
  -dds, --detected-downloaded-samples
                        Domain/Ip options: Show latest detected files that
                        were downloaded from this ip
  -uds, --undetected-downloaded-samples
                        Domain/Ip options: Show latest undetected files that
                        were downloaded from this domain/ip
  -dc, --detected-communicated
                        Domain/Ip Show latest detected files that communicate
                        with this domain/ip
  -uc, --undetected-communicated
                        Domain/Ip Show latest undetected files that
                        communicate with this domain/ip
  -drs, --detected-referrer-samples
                        Undetected referrer samples
  -urs, --undetected-referrer-samples
                        Undetected referrer samples

Process emails:
  -pe, --parse-email    Parse email, can be string or file
  -esa SAVE_ATTACHMENT, --save-attachment SAVE_ATTACHMENT
                        Save email attachment, path where to store
  -peo, --parse-email-outlook
                        Parse outlook .msg, can be string or file

Behaviour options:
  -bh, --behaviour      The md5/sha1/sha256 hash of the file whose dynamic
                        behavioural report you want to retrieve. VirusTotal
                        runs a distributed setup of Cuckoo sandbox machines
                        that execute the files we receive. Execution is
                        attempted only once, upon first submission to
                        VirusTotal, and only Portable Executables under 10MB
                        in size are ran. The execution of files is a best
                        effort process, hence, there are no guarantees about a
                        report being generated for a given file in our
                        dataset. a file did indeed produce a behavioural
                        report, a summary of it can be obtained by using the
                        file scan lookup call providing the additional HTTP
                        POST parameter allinfo=1. The summary will appear
                        under the behaviour-v1 property of the additional_info
                        field in the JSON report.This API allows you to
                        retrieve the full JSON report of the files execution
                        as outputted by the Cuckoo JSON report encoder.
  -bn, --behavior-network
                        Show network activity
  -bp, --behavior-process
                        Show processes
  -bs, --behavior-summary
                        Show summary

Download options:
  -dl, --download       The md5/sha1/sha256 hash of the file you want to
                        download or txt file with .txt extension, with hashes,
                        or hash and type, one by line, for example: hash,pcap
                        or only hash. Will save with hash as name, can be
                        space separated list of hashes to download
  -nm NAME, --name NAME
                        Name with which file will saved when download it
  -dt DOWNLOAD_THREADS, --download-threads DOWNLOAD_THREADS
                        Number of simultaneous downloaders

Additional options:
  --pcap                The md5/sha1/sha256 hash of the file whose network
                        traffic dump you want to retrieve. Will save as
                        hash.pcap
  --clusters            A specific day for which we want to access the
                        clustering details, example: 2013-09-10
  --distribution-files  Timestamps are just integer numbers where higher
                        values mean more recent files. Both before and after
                        parameters are optional, if they are not provided the
                        oldest files in the queue are returned in timestamp
                        ascending order.
  --distribution-urls   Timestamps are just integer numbers where higher
                        values mean more recent urls. Both before and after
                        parameters are optional, if they are not provided the
                        oldest urls in the queue are returned in timestamp
                        ascending order.

Distribution options:
  --before BEFORE       File/Url option. Retrieve files/urls received before
                        the given timestamp, in timestamp descending order.
  --after AFTER         File/Url option. Retrieve files/urls received after
                        the given timestamp, in timestamp ascending order.
  --reports             Include the files' antivirus results in the response.
                        Possible values are 'true' or 'false' (default value
                        is 'false').
  --limit LIMIT         File/Url option. Retrieve limit file items at most
                        (default: 1000).
  --allinfo             will include the results for each particular URL scan
                        (in exactly the same format as the URL scan retrieving
                        API). If the parameter is not specified, each item
                        returned will only contain the scanned URL and its
                        detection ratio.

Rules management options:
  --rules               Manage VTI hunting rules, REQUIRED for rules management
  --list                List names/ids of Yara rules stored on VT
  --create FILE         Add a Yara rule to VT (File Name used as RuleName
  --update FILE         Update a Yara rule on VT (File Name used as RuleName
                        and must include RuleName
  --retro FILE          Submit Yara rule to VT RetroHunt (File Name used as
                        RuleName and must include RuleName
  --delete_rule DELETE_RULE
                        Delete a Yara rule from VT (By Name)
  --share               Shares rule with user
  --update_ruleset UPDATE_RULESET
                        Ruleset name to update
  --disable DISABLE     Disable a Yara rule from VT (By Name)
  --enable ENABLE       Enable a Yara rule from VT (By Name)
✨ Khoshnus – Craft Beautiful Handwritten SVG Text Animations
Khoshnus is just a library, but it’s also your tool for bringing life to static text in an artistic way. With its
elegant SVG animations, your text can now be revealed as if written by hand!
🖋️ What Does Khoshnus Do?
Khoshnus lets you:
Animate SVG text with a beautiful, handwritten effect.
Choose from unique fonts with customizable animations.
Control each letter’s timing, stroke, and fill for a more personalized touch.
Transform plain text into an elegant visual experience.
🎨 Features
Multiple Font Styles: Choose from an array of fonts.
Smooth SVG Animation: Stroke and fill effects are animated for a lifelike handwriting experience.
Fine-Grained Control: Adjust timing and style for each letter—make them reveal at your own pace.
Fully Configurable: Every visual aspect of the text can be customized.
🚀 Quick Start
📦 Installation
To get started with Khoshnus, add the npm package to your project by running either of the following commands:
import{FONT_MATRIX,initialize,write}from"khoshnus"import'khoshnus/style.css'constApp=()=>{useEffect(()=>{constmanuscript=newManuscript();manuscript.setup({font: FONT_MATRIX["Pinyon Script"].name,fontSize: "10px",});consttextId=manuscript.write("Hello Universe, My Name Is Optimus Prime!")manuscript.erase(textId,{delayOperation: 15000})},[]);return(<div><svgid="khoshnus"width="100%"height="500"viewBox="0 0 100 100"xmlns="http://www.w3.org/2000/svg"></svg></div>)}
1. Include the SVG in Your HTML
Add an empty SVG element with the id of khoshnus that Khoshnus will use to animate your text. Feel free to adjust the size of the SVG
based on your needs.
// Create the Manuscript instance and setup global configuration.constmanuscript=newManuscript();manuscript.setup({font: FONT_MATRIX["Pinyon Script"].name,fontSize: "10px",});// Write the letters into the SVG element.consttextId=manuscript.write("Hello Universe, My Name Is Optimus Prime!")// Erase the text after the desired waiting period - optional, you can leave it forever ;)manuscript.erase(textId,{delayOperation: 15000})
3. Customize Your Animation
Khoshnus offers full control over your animation. Want the text to feel like it’s written slowly or quickly? You decide!
Here’s a glimpse of how you can tweak it:
initialize({font: FONT_MATRIX["Pinyon Script"].name,// Only fonts from FONT_MATRIX are available.fontSize: "16px",start: {startStrokeDashoffset: FONT_MATRIX["Pinyon Script"].strokeDashoffset,startStroke: "black",startStrokeWidth: 0.0000000001,startFill: "transparent",},end: {endStrokeDashoffset: 0,endStroke: "transparent",endStrokeWidth: 0.3,endFill: "black",},durations: {strokeDashoffsetDuration: 3500,strokeWidthDuration: 2500,strokeDuration: 2500,fillDuration: 4000,},});
✍️ Positioning & Delays
The magic of Khoshnus lies in its ability to provide positioning and delay control. Here’s an example:
write("Your Text Here",{writeConfiguration: {eachLetterDelay: 250,// Delay of each letter after the previous one.delayOperation: 0// Delay of the write operation - useful when you want wait time between written snippets.},textConfiguration: {x: "50%",// X position of the text.y: "50%",// Y position of the text.textAnchor: "middle",// Anchor of the text.dominantBaseline: "middle",// Baseline of the text - where it should align.fontSize: "12px"// Font size - appearance could possibly depend on the parent element.}});
💡 Advanced Example
Check out the following snippet:
constmanuscript=newManuscript();manuscript.setup({font: FONT_MATRIX["Pinyon Script"].name,fontSize: "10px",});consttextId0=manuscript.write("Do not lament my absence,",{textElementAttributes: {y: "10%",},writeConfiguration: {eachLetterDelay: 100}})consttextId1=manuscript.write("for in my spark,",{textElementAttributes: {y: "25%"},writeConfiguration: {delayOperation: 3000,eachLetterDelay: 100}})consttextId2=manuscript.write("I know that this is not the end,",{textElementAttributes: {y: "37.5%"},writeConfiguration: {delayOperation: 5500,eachLetterDelay: 100,}})consttextId3=manuscript.write("but merely,",{textElementAttributes: {y: "55%"},writeConfiguration: {delayOperation: 9500,eachLetterDelay: 100,}})consttextId4=manuscript.write("a new beginning.",{textElementAttributes: {y: "67.5%",},writeConfiguration: {delayOperation: 11500,eachLetterDelay: 100,}})consttextId5=manuscript.write("- Optimus Prime",{textElementAttributes: {x: "80%",y: "90%",},writeConfiguration: {delayOperation: 14000,eachLetterDelay: 100,}})manuscript.erase(textId0,{delayOperation: 20000});manuscript.erase(textId1,{delayOperation: 20000});manuscript.erase(textId2,{delayOperation: 20000});manuscript.erase(textId3,{delayOperation: 20000});manuscript.erase(textId4,{delayOperation: 20000});manuscript.erase(textId5,{delayOperation: 20000});
It generates the following piece of art:
Screen.Recording.2024-11-08.at.12.25.10.mp4
Multiple SVGs
It is possible to define multiple SVGs in your component/view as long as they have different ids and you define which Manuscript object references which SVG element. The following React.js snippet shows two SVG elements being referenced, each by its corresponding Manuscript object:
constApp=()=>{useEffect(()=>{constmanuscript1=newManuscript({svgId: "khoshnus-1",font: FONT_MATRIX["Pinyon Script"].name,fontSize: "10px",});consttext1=manuscript1.write("Do not lament my absence,",{textElementAttributes: {y: "10%",},writeConfiguration: {eachLetterDelay: 100}})manuscript1.erase(text1)constmanuscript2=newManuscript({svgId: "khoshnus-2",font: FONT_MATRIX["Pinyon Script"].name,fontSize: "10px",});consttext2=manuscript2.write("For in my spark,",{textElementAttributes: {y: "10%",},writeConfiguration: {eachLetterDelay: 100}})manuscript2.erase(text2)},[]);return(<div><svgid="khoshnus-1"width="100%"height="300"viewBox="0 0 100 100"xmlns="http://www.w3.org/2000/svg"></svg><svgid="khoshnus-2"width="100%"height="300"viewBox="0 0 100 100"xmlns="http://www.w3.org/2000/svg"></svg></div>)}
🖼️ Font Options
Here are some of the unique fonts you can play with:
BlackCherry: Bold strokes with an offset of 80
Celtic: Celtic-inspired, with a stroke offset of 50
Eutemia: Classic, elegant font with a 60 offset
Kingthings: Royal and medieval vibes, stroke offset of 40
Ruritania: Majestic, with an exaggerated offset of 280
VTKS: Artistic flair, with an offset of 150
Parisienne: Soft and feminine, offset of 100
Sevillana: Spanish-inspired curves, with an offset of 120
Pinyon Script: Formal and sophisticated, offset of 100
🌟 Creative Use Cases
Here are just a few ways you can use Khoshnus:
Display personalized signature animations for your website.
Add a dynamic handwritten greeting to your home page.
Animate text for art projects, digital invitations, or logos.
Create a storybook-like experience with flowing, hand-drawn text.
⚖️ License
This project is licensed under the MIT License, meaning you’re free to use, modify, and distribute it in both personal
and commercial projects.
Add NSPhotoLibraryUsageDescription to your Info.plist. It’s needed for uploading images.
Usage
Initialize Paldesk with your Api Key in app delegate:
// Swift
import Paldesk
func application(_ application:UIApplication, didFinishLaunchingWithOptions launchOptions:[UIApplicationLaunchOptionsKey:Any]?)->Bool{
// Override point for customization after application launch.
PaldeskSDK.initialize(apiKey:"Your Api Key")returntrue}
// Objective-C
#import<Paldesk/Paldesk.h>
- (BOOL)application:(UIApplication *)application didFinishLaunchingWithOptions:(NSDictionary *)launchOptions {
// Override point for customization after application launch.
[PaldeskSDK initializeWithApiKey:@"Your Api Key"];
returnYES;
}
If you wish to enable logging, just add “loggingEnabled” parameter to initialize method:
// Swift
PaldeskSDK.initialize(apiKey:"Your Api Key", loggingEnabled:true)
// Objective-C
[PaldeskSDK initializeWithApiKey:@"Your Api Key"loggingEnabled:true];
Starting conversation
To start conversation from your app, use:
// Swift
PaldeskSDK.startConversation(viewController:self)
Depending on your Client authentification type settings from Webapp -> Administration -> iOS SDK (https://www.paldesk.com/), you can choose three options:
No data required – client will appear as “visitor” – you are free to start conversation without setting information about your client
You provide information about client through code – you can create client when your client becomes available to you with following method:
// Swift
letparams=["email":"clientemail@mail.com","externalId":"123456","firstName":"First Name","lastName":"Last Name"]PaldeskSDK.createClient(params: params)
Email and ExternalId fields are mandatory and other fields are optional. ExternalId should be something unique from your side, preferably your client’s id (or even email).
If client information is not provided, your client will appear as “visitor”. You can explicitly create “visitor” by calling:
Client provides his information through form – your user will have to provide his information in registration form which will be shown on first start (prior to starting conversation).
Clearing client
To clear (logout) current client, use:
// Swift
    PaldeskSDK.clear()
// Objective-C
    [PaldeskSDK clear];
Important: If you call create client method multiple times, it will matter only first time. If you wish to create different client, please call clear method first and then you are able to create client again.
VMinteq is considered as a state of the art reference in the context of chemical speciation computation. However, it is an old fashioned closed source Windows GUI application that cannot be integrated in other models.
The purpose of CHEMMISOL is to provide equivalent features in a flexible, performant, open source, cross platform and embeddable way.
The following table represents a non-exhaustive list of features supported by VMinteq (except for the “Solver algorithm”), and how they are currently supported by CHEMMISOL.
Even if CHEMMISOL already allows to solve equilibriums in complex chemical systems, a lot of features are still missing, and will probably never be included, depending on our own needs.
Even if the equilibrium solving algorithm of VMinteq seems to be based on the Newton method, the exact algorithm used is unclear. In consequence, the “solver algorithm” features cannot be compared directly with VMinteq.
[1] K. Meintjes and A. P. Morgan, “A methodology for solving chemical equilibrium systems,” Applied Mathematics and Computation, vol. 22, no. 4, pp. 333–361, Jun. 1987, doi:10.1016/0096-3003(87)90076-2.
Compilation and installation
Compile
The library can be compiled as a regular CMAKE project.
The library can be installed on the current system with:
cd build
cmake --install .
Depending on your OS and installation, you might need to run sudo cmake --install .
Specification of chemical systems
The definition of chemical systems in CHEMMISOL is based on the concept of components, chemical species and reactions.
Basically, to define a chemical system, it is required to:
Define a set of reactions.
Define components and their total quantities.
Components are the building blocks of reactions: the purpose of reactions is to specify how chemical components can combine to form complex chemical species.
Reactions
Chemical components basically represent canonical species that cannot be divided. A reaction must be specified as a set of reagents, associated to stoichiometric coefficients. By convention:
Reactants are specified with positive coefficients.
Products are specified with negative coefficients.
All reactants and products must correspond to components of the chemical system, except one reagent, that represents the produced species of the reaction.
Example 1
Reactions:
H2 <-> H + H
2 H2O <-> 4 H + O2
Components:
H
H2O (solvent)
The specification of this system is correct. The produced species of reaction 1 is then H2, and the produced species of reaction 2 is O2.
Example 2
Reactions:
H2 <-> H + H
2 H2O <-> 2 H2 + O2
Components:
H2
O2
The specification of this system is correct. The produced species of reaction 1 is then H, and the produced species of reaction 2 is H2O.
Example 3
Reactions:
H2 <-> H + H
2 H2O <-> 4 H + O2
Components:
H2
H2O (solvent)
The specification of this system is wrong, since two chemical species that are not components are identified in reaction 2: H and O2. In consequence, the produced species of reaction 2 cannot be properly identified.
Components and species
A chemical species is a concrete physical entity that lives in the chemical system and can interact with other species. Each chemical species is associated to a quantity (typically in mol), a concentration (typically in mol/l) and an activity (without unit, used in the computation of reaction quotients).
As seen in the reaction example above, chemical species can be defined in two ways:
Implicitly, as produced species of reactions.
Explicitly, by declaring components.
Indeed, each chemical component is automatically associated to a chemical species with the same name. However, the nature of a component is different from the nature of chemical species, since it represents the total quantity of species constituted from this component.
For example, let’s consider the following system:
Reactions:
H2O <-> OH- + H+
PO4 + 3H+ <-> H3PO4
Components:
H+
PO4
H2O (solvent)
Produced species are then OH- and H3PO4.
The total quantityN of the PO4 and H+ components are then defined as follows:
N(PO4) = n(PO4) + n(H3PO4)
N(H+) = n(H+) - n(OH-) + 3 * n(H3PO4)
where n denotes the quantity of each chemical species. Notice that n(PO4) and n(H+) denote the quantities of PO4 and H+ species, that are likely not equal to total quantities of PO4 and H+ components. See the ChemicalComponent documentation for more details about how the total quantities are computed.
In practice, the user input of the model represents the total quantity of each component. The actual quantity of each species is then determined by the solved equilibrium state of the chemical system.
Usage
Basic usage
The CHEMMISOL API aims to be as simple as possible, in order to facilitate its integration within other projects and models. Here is a basic usage example:
#include"chemmisol.h"usingnamespacechemmisol;intmain(int, char *[])
{
ChemicalSystem chemical_system;
// Defines the reaction H2O <-> OH- + H+ (log K = -13.997)
chemical_system.addReaction("OH-", -13.997, {
{"OH-", -1},
{"H+", -1},
{"H2O", 1}
});
// Defines the reaction Na+ + Cl- <-> NaCl (log K = -0.3)
chemical_system.addReaction("NaCl", -0.3, {
{"NaCl", -1},
{"Na+", AQUEOUS, 1}, // AQUEOUS specified here only for// demonstration purpose, since it should be// the default phase
{"Cl-", AQUEOUS, 1}
});
// Defines the reaction H2O + Na+ <-> NaOH + H+ (log K = -13.897)
chemical_system.addReaction("NaOH", -13.897, {
{"NaOH", -1},
{"H+", -1},
{"Na+", 1},
{"H2O", 1}
});
// Defines the Na+ component and sets its total concentration to 0.1 mol/l
chemical_system.addComponent("Na+", 0.1*mol/l);
// Defines the Cl- component and sets its total concentration to 0.1 mol/l
chemical_system.addComponent("Cl-", 0.1*mol/l);
// Defines the H2O component as a solvent
chemical_system.addSolvent("H2O");
// Automatically adds the H+ component and fixes the pH to 7
chemical_system.fixPH(7);
// Solves the equilibrium state
chemical_system.solveEquilibrium();
return0;
}
This basic example is available in the examples directory and can be run with:
cd build
./examples/basic_chemical_system/basic_chemical_system_example
Expected output:
[chemmisol-core] I Solving chemical equilibrium.
[chemmisol-core] I Init activities:
[chemmisol-core] I (C) Na+: 0.1
[chemmisol-core] I (C) Cl-: 0.1
[chemmisol-core] I (C) H2O: 1
[chemmisol-core] I (C) H+: 1e-07
[chemmisol-core] I OH-: 0
[chemmisol-core] I NaCl: 0
[chemmisol-core] I NaOH: 0
[chemmisol-core] I Solved activities:
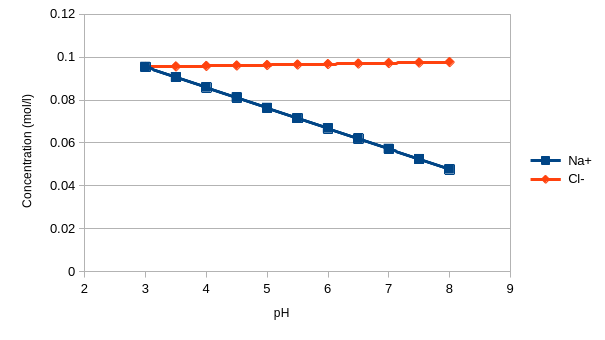
[chemmisol-core] I (C) Na+: 0.0954352
[chemmisol-core] I (C) Cl-: 0.0954352
[chemmisol-core] I (C) H2O: 1
[chemmisol-core] I (C) H+: 1e-07
[chemmisol-core] I OH-: 1.00693e-07
[chemmisol-core] I NaCl: 0.00456476
[chemmisol-core] I NaOH: 1.20979e-08
Setting and fixing pH and quantities of other chemical components
The pH of the chemical system can be fixed with the fixPH() method.
However, it is also possible to initialize the pH of the system using the initPH() method. In this case, the pH is set as the total quantity of the H+ component (or any other user defined component eventually specified as argument by the user). The pH is then dynamically determined depending on the solved chemical equilibrium.
As fixing the pH is equivalent to fixing the concentration of H+, the concentration of any component can be fixed in CHEMMISOL, using the fixComponent() method.
The total quantity of a component can also be initially specified using the addComponent() method.
This project includes helper functions for working with dictionaries in Monkey C.
The utils include:
compareDictionaries() that checks if two dictionaries are equal (by comparing their keys and values)
mergeDictionaries() that adds keys/values of two dictionaries
Usage
As any other barrel, in order to use this one, developers will need to add it to the current project.
This can be done through the Visual Studio Code’s Monkey C Extention
(“Monkey C: Configure Monkey Barrel” option) or by manually editing a project’s Jungle and manifest file.
Once it has been added to a project, the compiler starts “to see” the barrel.
There is no need for importing it, unless you want to use alias for the library.
You can obtain the compiled .barrel file from project’s releases page.
Description
Merge dictionaries
This function adds or overwrites values from one dictionary into another dictionary.
This function compares two dictionaries and returns true if they are equal and false otherwise.
The function test value equality. The objects here are considered equal, when they have the same keys and corresponding values.
ATTOW, Connect IQ SDK (6.4.2) doesn’t provide reliable way for comparing dictionaries by value. For example, { "a1" => 1, "a2" => 2 } and { "a2" => 2, "a1" => 1 } are two different dictionaries (when you compare them with equals()). Please note, that the keys and corresponding values are the same.
vardict1={"a"=>1,"b"=>2,"c"=>3};vardict2={"b"=>2,"a"=>1,"c"=>3};var result =DictionaryUtilsBarrel.compareDictionaries(dict1,dict2);
The code above returns true.
vardict1={"a"=>1,"b"=>2,"c"=>3};vardict2={"b"=>2,"a"=>1};var result =DictionaryUtilsBarrel.compareDictionaries(dict1,dict2);
returns false as dict2 doesn’t contain element c .
vardict1={"a"=>1,"b"=>{"k1"=>"v1","k2"=>"v2"}};vardict2={"a"=>1,"b"=>{"k1"=>"v1","k2"=>"different"}};var result =DictionaryUtilsBarrel.compareDictionaries(dict1,dict2);
will result with false (k2 has different value).
Build and export
You can build and export the barrel using the IDE (i.e. “Monkey C: Export Project” or “Monkey C: Build Current Project” commands of Monkey C Extention for VS Code) or with the following command:
If you want to contribute to this project, please fork the repository and create a pull request, or open an issue for discussion.
License
This project is licensed under the Apache License 2.0. This means you can freely use, modify, and distribute it, under the terms of the Apache License. You can read the full text of the license at http://www.apache.org/licenses/LICENSE-2.0.
Please follow the installation instructions of your machine.
As long as you can run docker hello-world container and test nvidia-smi with a cuda container, you are ready to go.
Let’s test that you are ready by pulling out our docker image
docker run --runtime=nvidia -ti escorciavkaust/caffe-python-opencv:latest caffe device_query --gpu 0
You should read the information of your GPU in your terminal.
Let’s go over the installation procedure without the headache of compilation errors.
Let’s use a snapshot of the code with less headaches
If this branch is useful for you, we would appreciate that you cite our work:
@article{EscorciaDJGS2018,
author    = {Victor Escorcia and
             Cuong Duc Dao and
             Mihir Jain and
             Bernard Ghanem and
             Cees Snoek},
title     = {Guess Where? Actor-Supervision for Spatiotemporal Action Localization},
journal   = {CoRR},
volume    = {abs/1804.01824},
year      = {2018},
url       = {http://arxiv.org/abs/1804.01824},
archivePrefix = {arXiv},
eprint    = {1804.01824}
}
TODO: update bibtex with Corpus-Moment-Retrieval-work
The original project is on the master branch.
A functional version of the Text-to-Clip project that is expected to run without issues is on the cp-functional-testing branch.
Original README 👇
Multilevel Language and Vision Integration for Text-to-Clip Retrieval
Code released by Huijuan Xu (Boston University).
Introduction
We address the problem of text-based activity retrieval in video. Given a
sentence describing an activity, our task is to retrieve matching clips
from an untrimmed video. Our model learns a fine-grained similarity metric
for retrieval and uses visual features to modulate the processing of query
sentences at the word level in a recurrent neural network. A multi-task
loss is also employed by adding query re-generation as an auxiliary task.
License
Our code is released under the MIT License (refer to the LICENSE file for
details).
Citing
If you find our paper useful in your research, please consider citing:
@inproceedings{xu2019multilevel,
title={Multilevel Language and Vision Integration for Text-to-Clip Retrieval.},
author={Xu, Huijuan and He, Kun and Plummer, Bryan A. and Sigal, Leonid and Sclaroff,
Stan and Saenko, Kate},
booktitle={AAAI},
year={2019}
}
This library holds common build tasks, lint configuration and so on, used by my personal node.js and web projects.
This allows for a central configuration for all projects.
Usage
In order to use this library, you need to refactor your build processes as defined in some of my projects such as simple-oracledb
Installation
In order to use this library, just run the following npm install command: