pyLoad is a free and open source downloader for 1-click-hosting sites like rapidshare.com or uploaded.to. It supports link decryption as well as all important container formats.
When you start the pyload image, you can adjust the configuration of the pyload instance by passing one or more environment variables on the docker run command line.
UID
This variable is not mandatory and specifies the user id that will be set to run the application. It has default value 12345.
GID
This variable is not mandatory and specifies the group id that will be set to run the application. It has default value 12345.
AUTOUPGRADE
This variable is not mandatory and specifies if the container has to launch software update at startup or not. Valid values are 0 and 1. It has default value 0.
TZ
This variable is not mandatory and specifies the timezone to be configured within the container. It has default value Europe/Brussels.
DOCKRELAY
This variable is not mandatory and specifies the smtp relay that will be used to send email. Do not specify any if mail notifications are not required.
DOCKMAIL
This variable is not mandatory and specifies the mail that has to be used to send email. Do not specify any if mail notifications are not required.
DOCKMAILDOMAIN
This variable is not mandatory and specifies the address where the mail appears to come from for user authentication. Do not specify any if mail notifications are not required.
DOCKUPGRADE
This variable is not mandatory and specifies if the container has to launch software update at startup or not. Valid values are 0 and 1. It has default value 0.
Se espera crear un modelo para predecir las habilidades más demandadas en el mercado laboral. Esto puede ayudar a los profesionales, estudiantes y la industria en general a tomar decisiones informadas sobre qué habilidades desarrollar y mejorar.
El objetivo principal del proyecto es analizar las ofertas laborales en el campo de los datos y con el propósito de identificar patrones y tendencias que revelen las habilidades más demandadas en el mercado laboral actual. Esta investigación puede ayudar a las personas interesadas en este ámbito o que quieran meterse a este, ayudando a determinar si es la predicción deseada como una decisión laboral. Todo esto mediante el dataset de kaggle Data Jobs Listings – Glassdoor.
Archivos del repositorio
EDA_project.ipynb: Esta todo el analisis exploratorio de las tablas usadas que son “glassdoor.csv”, “glassdoor_benefits_highlights.csv” y “glassdoor_salary_salaries.csv” (descargar estos csv para la ejecucion del codigo).
ETL_project.pdf: Es el documento en el cual estan descritas las fases realizadas y explicadas a detalles.
dataJobs_script.py: Este el codigo principal en el que se realizo la conexion a postgresql, se cargaron los datos a la BD, se reemplazaron los valores nulos en algunas columnas, campos vacios y normalizaciones para los titulos del trabajo.
df_tocsv_and_transfomations.py: Aqui se tuvo que usar pandas para poder incrustar correctamente el csv y donde se realizo la mayor transformación de datos para la normalizacion del jobTitle.
dimesions_script.py: Aqui se hace la inserción de datos en las ds dimensiones que se va a hacer uso mas en el futuro del proyecto.
project_dashboard.pdf: Es el dashboard que realice en power bi, con tres graficas por ahora.
¿Como correr los scripts?
Clone el repositorio con https://github.com/VinkeArtunduaga/dataJobs_project.git
Instale python 3.11
Instale la base de datos PostgreSQL
Para las librerias es necesario hacer pip install psycopg2, pip install pandas y seran instaladas, tambien se usan json y csv pero se supone que estan predeterminadas.
Crear un usuario y contraseña para el uso de postgreSQL
Crear una database en pgAdmin 4 llamada ETL (asi fue como le puse el nombre a la mia pero se puede cambiar)
Cambie las configuraciones de la conexion a la base de datos segun el usuario, contraseña y database asignados
Corra primero el codigo de df_tocsv_and_transformations.py en la terminal mediante python df_tocsv_and_transformations.py
Luego python dataJobs_script.py para de esta manera crear la tabla principal con sus normalizaciones y limpieza de nulos.
Para luego correr el de la creacion de las dimesiones python dimensions_script.py
En caso de querer realizar el proceso de EDA:
Descargar Jupyter para mas facilidad con Jupyter lab
Al ya tener descargadas las librerias de json y pandas o no haber podido ser instaladas ejecutar en la terminal pip install pandas y pip install json
Cambiar la direccion de donde se encuentran los archivos csv de glassdoor.csv, glassdoor_benefits_highlights.csv y glassdoor_salary_salaries.csv.
Al ejecutar cada uno de los bloques o de corrido deberia apreciarse el analisis.
Para la segunda parte del proyecto hice una carpeta llama API ahi estan todo lo que se realizo.
Copy this plugin to the auth\cfour folder on the server
Login as administrator
Go to Site Administrator > Notification
Install the plugin
Add the correct AUTHENTICATION key to the settings /admin/settings.php?section=authsettingcfour.
Enable the authentication module /admin/category.php?category=authsettings.
Usage
A user should already be created in Moodle. You can add a new user with the API, make sure auth property must have the value cfour for security reasons.
Build a link on a external system, see the example below.
<?php#External system, samplecodedefine('SHARED_AUTHENTICION_KEY' , 'LONG_KEY_HERE');
/** * Get a authentication code * * @param int $userid * @param string $username * @return string */functionget_code(int$userid , string$username ){
returnhash('sha256', SHARED_AUTHENTICION_KEY . '|' . $userid . '|' . $username);
}
// Building the link.$domain = 'https://moodle.test.domain.com/';
$plugin = 'auth/cfour/login.php?';
// The user that exists in Moodle and has `cfour` auth property in there account.$moodleusername = 'student1';
$moodleuserid = 2;
$params = [
'sso_username' => $moodleusername,
'sso_code' => get_code($moodleuserid , $moodleusername),
'wantsurl' => '/course/view.php?id=2'
];
// Make sure all params get urlencoded!$url = $domain . $plugin . http_build_query($params);
// https://moodle.test.domain.com/auth/cfour/login.php?sso_username=student1&sso_code=&wantsurl=%2Fcourse%2Fview.php%3Fid%3D2header('Location: ' . $url);
die;
Use the link where you want. Keep in mind there is no expiry date implemented.
Security
If you discover any security related issues, please email luuk@MFreak.nl instead of using the issue tracker.
License
The GNU GENERAL PUBLIC LICENSE. Please see License File for more information.
Changelog
See version control for the complete history. Major changes in this version will be listed below.
Open new tab of terminal to begin frontend running.
Install node modules required for web frontend
npm install
Starting web frontend application
npm run start
URL Shortener
Description:
Nobody likes an impossibly long URL.
They’re hard to decipher. But sometimes, between a deep directory structure on a site, plus a large number of parameters tacked on to the end, URLs just begin to get unwieldy. And back in the days before Twitter added their own link shortener to their service, a long URL meant taking precious characters away from your tweets.
Today, people use link shorteners for a slew of reasons. They can make it much easier to type, or remember, an otherwise lengthy bare URL. They can bring a consistent branding to a social media account. They make it easier to perform analytics across a group of URLs. They make it possible to provide a consistent entryway to a URL that may change frequently on the other side.
There are some challenges to URL shorteners, to be sure. They make it challenging to figure out where a link is actually taking you before you click, and they’re vulnerable to linkrot, should the service providing the short URL for you ever disappear. But despite these challenges, URL shorteners aren’t going anywhere anytime soon.
But with so many free link shortening services out there, why roll your own? In short: control. While some services will let you pick your own domain to use, sometimes, that’s about the level of customization you’re going to get. With a self-hosted service, you decide how long your service operates for. You decide what format your URLs take. You decide who has access to your analytics. It’s yours to own and operate as you please.
422UnprocessableEntity{"status": false,"errors": ["Shorten URL is not valid"]}
Known issues:
Potential issues:
Users can exploit Xkcd 1171 to insert malicious URLs into our endpoints.
The Ruby standard library already comes with an URI parser, accessible via URI.parse.
Users can also pass links with vulnerable to Link rot,
An HTTP client for Ruby Net::HTTP provides a very powerful library.
Net::HTTP is designed to work with URI.
Finally, I will check if the request was successful or will be redirected to another url.
Rails provides an API to create custom validations. We will use this to build a URL validator that.
Also, the original url should not be from current host. Which only for shortened url.
The project uses Net:HTTP to get request from other sites a lot.
In addition to queries database, Take full advantage of Rails’ built-in action, page and fragment caching.
Use memcache to cache results that you’d otherwise pull from your database or request info from urls.
In addition to using database to store slugs along original urls, we can generate them to html, json, yaml.
Implement use RDMS less, fully change to Redis for storing. Remove database connection for all requests.
Reconfiguring the server when accessing it will redirect directly from the file without querying any data from the database.
Maintainability:
Should implement RSPEC for unit test.
Github actions, Heroku pipeline, PR preview env, staging env already installed workflows, and activated package issues security alert bots can proactively inform notifications if dependencies need to be updated or replaced.
These are a number of scripts designed to add programmable completion to bash for some of the command line tools. They complete the options for
each tool, for most the completion cuts in after - or --.
If you have installed bash completion using brew then drop the files
into /usr/local/etc/bash_completion.d/ (or link them) and open a new
Terminal window.
Feedback, bug reports and comments would be greatly appreciated. If you
want to nominate a CLI tool for me to add to this set, drop me a note or
open an issue.
For zsh
You can use bash completions with zsh just close to the top of .zshrc put :
and the line source <path to directory of completions>/* right at the end, e.g. source ~/bin/bash_completion/*.
Notes
bless
For bless it first completes on the action option and then
completes on the options for that action.
diskutil
For diskutil it first completes on the verb and then the options for
the verb. For options prefaced with - it will only complete after you
enter the -. For verbs such as eraseDisk where you specify a format
argument it will also complete the formats. No work has been done to
create more specific completion than at the verb level or to make sure
you have options and arguments in the right order. Quite a lot of the
verbs take no options.
hdiutil
For hdiutil it first completes on the verbs and then completes on the
options for each verb once you enter the -. No work has been done to
create more specific completion than at the verb level or to make sure
you have options and arguments in the right order.
quickpkg
It will complete all the options. If you enter the option --ownership
it will then complete on the the three possibilities. If you enter the
option --keychain then it will complete on all the keychains the
system knows about.
networksetup
If you enter a - it will complete on the options (there are a heck of
a lot). Most options require a service name, if you enter " then it
will complete on the current service names.
If you want to complete on a hardware port then enter ' (that’s a single
quote) then it will complete on the hardware ports. I’m still figuring out
how to handle the few options that want either a hardware port or
device name.
The Airport and wireless options want a device name (‘en0’, ‘bridge0’ etc)
so they will complete the device names. This is handier on Macs with a
bunch of psuedo devices.
More expansions to this may come. Feedback appreciated.
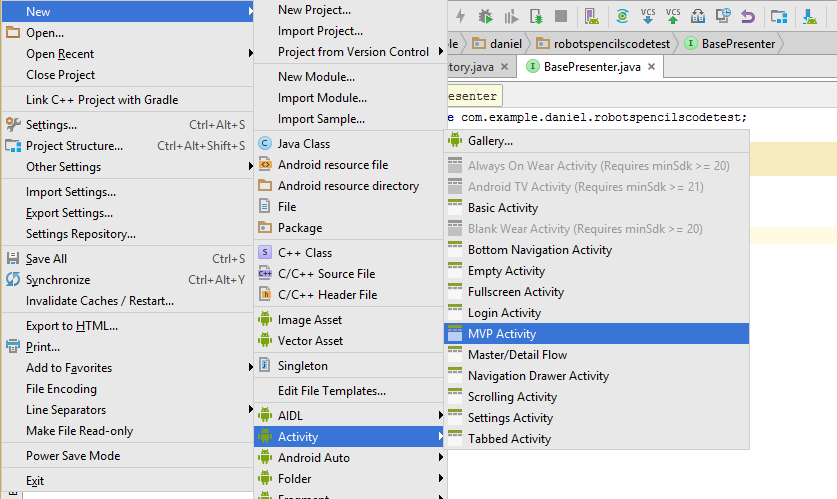
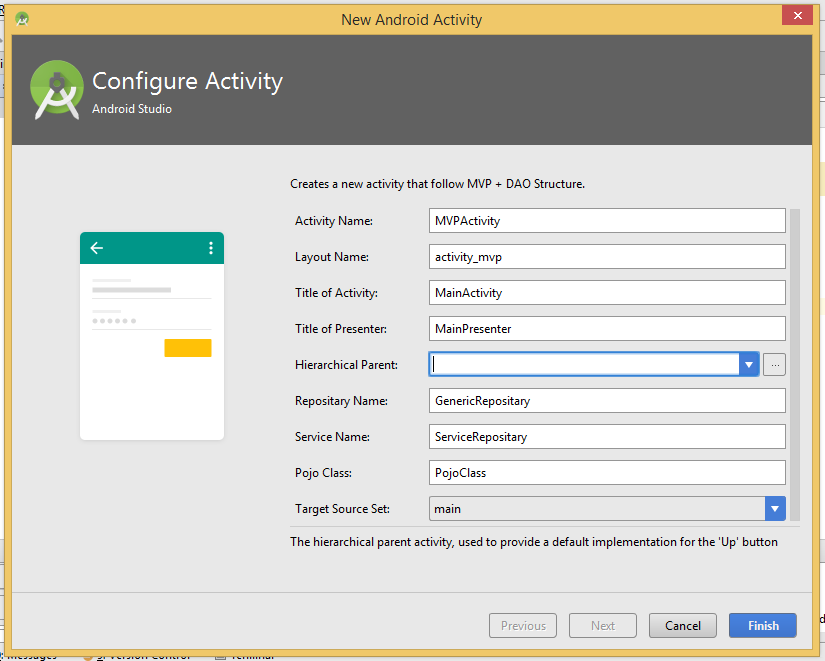
Copy MVP with Respositary Pattern folder in your Android Studio installation in this folder: <androidStudio-folder>/plugins/android/lib/templates/activities
Restart Android Studio, and you will find it in: New -> Activity -> MVP with Respositary Pattern
Permission is hereby granted, free of charge, to any person obtaining a copy
of this software and associated documentation files (the “Software”), to deal
in the Software without restriction, including without limitation the rights
to use, copy, modify, merge, publish, distribute, sublicense, and/or sell
copies of the Software, and to permit persons to whom the Software is
furnished to do so, subject to the following conditions:
The above copyright notice and this permission notice shall be included in all
copies or substantial portions of the Software.
THE SOFTWARE IS PROVIDED “AS IS”, WITHOUT WARRANTY OF ANY KIND, EXPRESS OR
IMPLIED, INCLUDING BUT NOT LIMITED TO THE WARRANTIES OF MERCHANTABILITY,
FITNESS FOR A PARTICULAR PURPOSE AND NONINFRINGEMENT. IN NO EVENT SHALL THE
AUTHORS OR COPYRIGHT HOLDERS BE LIABLE FOR ANY CLAIM, DAMAGES OR OTHER
LIABILITY, WHETHER IN AN ACTION OF CONTRACT, TORT OR OTHERWISE, ARISING FROM,
OUT OF OR IN CONNECTION WITH THE SOFTWARE OR THE USE OR OTHER DEALINGS IN THE
SOFTWARE.
You can retrieve the above environment values by referring their docs linked above and once retrieved, paste above accordingly.
*** Important: Videos from Youtube ***
During local development, we recommend you to add the environment variable DEVELOPMENT=true as that won’t fetch videos from the Youtube API and instead access it from data/videos.json. Youtube API does have a quota and this way you can continue doing local development without worrying about running out of API calls.
Learn More
To learn more about Next.js, take a look at the following resources:
Draw2Text is an innovative web application that recognizes numbers and letters drawn by users in the canvas. It uses advanced machine learning algorithms, including computer vision and deep learning, to segment the drawn image, predict the digit/letter label, and display the result to the user. The app also enables users to provide feedback, which can be used to fine-tune the model for better accuracy in future predictions.
How it works
The user draws a digit or letter on the provided canvas
The app uses OpenCV, an open-source computer vision library, to segment the canvas in digits images
The segmented image is then passed to a neural network created with Keras, which uses deep learning techniques to predict the digit label.
The predicted label is then displayed to the user.
The user can provide feedback to improve the model’s accuracy in future predictions.
graph TD
    A["User Drawn Digit"] --> B["OpenCV Segmentation"]
    B --> C["Keras Model"]
    C --> D["Digit Label Prediction"]
    D --> E["Display Predictions"]
    E --> F["User Feedback for Future Tuning"]
    F --> C
Loading
Getting Started
To run the app locally, please follow these steps: